Showing posts with label space saving. Show all posts

Saturday, 25 August 2012

Sorting out my Space!! (part 2)

Right - so here is some pics from before we moved everything around:

- this is my desk. I don't know if you can see it bending in the middle and leaning forward, but it is!! :)


...and this is the OH's desk, on the opposite wall to mine.


...and this is the OH and my soon to be Father in Law setting things up after swapping the desks over.


Well, we went shopping for project craft room last week. A quick trip to B&Q and we were kitted out with all we needed. My desk had been reinforced and remodelled to fit the new space, the filing cabinet was in place and we had a general idea of what we wanted.


Initially there was going to be a built in shelving unit above the filing cabinet, but after considering this I decided it would make the shelves dark and would close my desk in massively. I decided that extending the shelving straight to the wall would be a better idea.


I came home from work earlier on in the week and found that my OHs dad had been hard at work in our study – the shelves had gone up and everything was looking a lot more finished! In fact  the only thing left to do now is decide on some under desk storage!! 

I spent a good few days putting everything back into the study... I am completely in love with my new craft space!!! I LOVE the silver racking – it’s SOOOOO useful!! and it makes me feel like I own a shop!! lol!! 

It’s going to take a few months of using things and re-organising things to get it into perfect order but I think it looks pretty darn good. I think I even have space to store my sewing machine in here - I might actually get round to using it!!!

Thats it for now - Im off to reorganise my stuff!!
Speak soon!xxxx

Friday, 17 August 2012

Sorting out my Space!! (part 1)

I am super excited at the moment – me and the OH are having a sort out in the study.
My desk has been a problem since we moved into this house – we had to take 7cm off the depth to make sure we could get the 2 desks in with enough space for the chair in-between them.....
HOWEVER – the desk isn’t solid wood – it’s full of corrugated cardboard. By cutting the edge off we weakened the structure and the desk bowed in the middle.
We also have a huge table top shelving system on it which makes the desk lean; like a very leany thing in a gale force wind!! With the amount of craft stuff I have precariously balanced on the top the desk is actually quite dangerous!!
So, after talking about what we could do we have agreed to get me some decent storage. I am moving from the right-hand side to the left-hand side, swapping my desk for a wall to wall work bench and gaining more surface space. I am searching the internet for pics of craft rooms and ideas on how to make the space as usable as possible!
It’s amazing how big a room becomes when you take all your stuff out of it! LOL!
Will keep you updated on the project! If you have any crafty storage ideas or tips – please let me know!!
Speak soon.xxx

Wednesday, 21 March 2012

Save those Scraps!

I hold my hands up - I never used to save scrap paper or card. If it was smaller than a playing card I would chuck it! *shakes head in shame* chatting with my crafty friends I discovered how wasteful I was being! I'm proud to say I have been keeping scraps for about 3 years now :)

my issue was I kept all the scrap in a box about the size of a shoe box, all shoved  in with everything just thrown in ontop of each other.  I found that I had the same problem I had with my stamps - I was only ever using the top few bits to do anything with.

A trip to Ikea solved all my problems!!

I bought a pack of 2 suspension file boxes and have used one to  file all my scraps in. I sorted all the bits of paper out into separate colours and put each colour in its own drop file. I have: Multi, Red, Orange & Brown, Yellow, Green, Blue, Pink, Purple, Black & White and Gold & Silver. simples! also keep scrap black and white card tucked into the front - VERY handy for stamping if youre then going to cut and mount!!


It's unbelievable how easy it is to find things now! my card and paper stock is lasting so much longer because I'm not cutting into a new piece every-time!!!


My 'Pink' scraps!!

The suspension boxes themselves are quite reasonably priced, though it wasn't a cheap trip to Ikea; i ended up buying 12 different sized boxes for all my different bits and bobs but it was TOTALLY WORTH IT!! My inks, magazines, punches, wooden stamps, peel offs, embossing kit, packs of cards and envolopes, everything - has a nice new home. my craft room has never looked to neat!! and everything is so easy to find now. I will have to post a picture....when it is looking a little more tidy!! 

That's it for now,
Big Love and Speak soon!
xxxxx

Wednesday, 28 September 2011

Promarker and Stamp storage ideas...

Hello peeps!
the past couple of days I have been sorting out my craft room to try and turn my creative bombsite into some kind of organised crafting heaven :)

I have to say from the start that these storage ideas are unfortunately not my own original sparks of brilliance - they came from a discussion with some crafty friends  and from searching the internet for storage solutions! anyway - they worked for me, so I am sharing them with anyone who wants to use them!

PROMARKERS
I LOVE my promarkers but I quickly loose patience when I end up pulling the same colour out of the box umpteen times. so I have colour coded them. not a new idea, i know, but i found it really useful :)


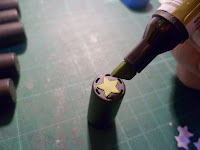
I picked a cute star punch for the top of each pen lid. next I used double sided tape on some white card and punched out the stars. ta-da!! peel off the backing tape...sticky stars! I used the same white card that I use when stamping, so that the coloured star shows the true colour it will be when used to colour my images…


next I stuck the stars onto the flat topped promarker caps and coloured them in. i found it easier to colour the stars after they were stuck on the lid - much too fiddly when they weren't stuck down.


now all my promarkers are labelled and I can see exactly what colours they are without taking them out of the box!!! WOOOOOO!!!


also - on the side of my box I have cut out the colour chart that comes with every pack of pens and glued it to the side. I've then marked off which pens I have. useful for when I'm looking at buying new sets and need to know which ones I haven't got! :)

I think when I get more I might look into something a little more organised than my box... I found a clip on YouTube where a woman used a CD holder from Tesco. VERY good idea - take a look!!!


CLEAR STAMPS
This will work with ANY stamp that you use with an acrylic block...

I got hold of some CD cases and took the black bits out of the case (the bit the CD snaps onto) so I was left with just the clear outer bit.

I took my pack of stamps and put them into the case - the 'cling' of the stamp sticks to the plastic like it does to an acrylic block. I then numbered the case using a Sharpie.

next, I stamped everything in that case onto a sheet of A4 paper and numbered the page. I did this with all of my clear stamps, and my stamps with Kling-On foam.


I put all the sheets of paper (in number order) into a ring binder. I now have a very organised number system for my stamps. The chaos that was my stamp drawer is now a very nice looking set of 3 boxes on my shelf. I bought the boxes from Instore for about £3 each. each box holds 20 CD cases.


since doing this I have found that I use SO many more of my stamps - before I only ever used the stamps on the top of the pile... I had NO IDEA what I had. now I have a quick flick through and I can see everything I own... and the actual stamp size too!! UBER useful!

I have also done a few pages in the front of the ringbinder for my embossing folders too... it's nice to know what you have and what it looks like so by having pieces of the embossed paper in the folder it makes it a quick easy reference.


really hope these ideas are useful - they were for me :) lemme know if you have any crafty storage solutions too - post a link or a piccy! always looking for ways to make my crafting life easier! :)


That's it for now... will have to tell you about my scrap box solution another time!x
keep crafting - speak soon.xxx